Active@ UNDELETE Ver 2.0
See documentation for latest version
Configuring a Network Installation
Network configuration is available for Enterprise version only.
User Defined Console
Allows you to configure MMC Snap-In to access remote computer, see its drives and undelete files from them remotely.
You can change computer you connected to for the current Snap-In, or add another Snap-In to the current MMC Console.
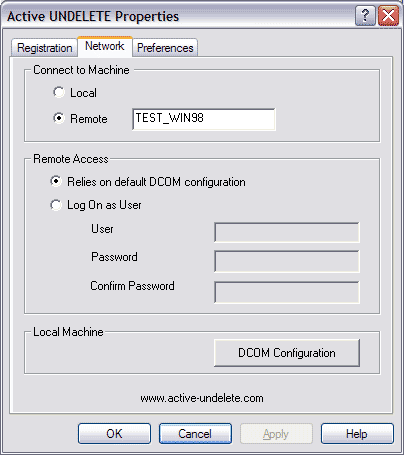
To change computer you currently connected to for the Snap-In, open Network tab in
Snap-In's properties:
- Start Active@ UNDELETE console and select the Active@ UNDELETE node.
- Open Properties window by one of the following methods:
- Click the Properties button on the toolbar
- Right-click the Active@ UNDELETE node, and then click Properties from the
context menu
- Go to the Network tab and configure options (see below)
- Select Snap-In node that you configured and click Refresh button on a toolbar to
connect to the remote computer and see its drives, or save and re-load Console itself
- If something is not configured properly, error messages appear (see
Important section below), and you can go to Snap-Ins properties and change
Network settings again
To add another Snap-In connected to the remote computer to the current MMC Console:
- Start Active@ UNDELETE console, or run MMC.exe and create new console
- Press Ctrl+M, or select Add/Remove Snap-in... from the Console menu
- Click Add... button to add new Snap-In
- Select Active@ UNDELETE in the list of available Snap-Ins
- Click Add button once more, and Active@ UNDELETE configuration Wizard starts
- At the Registration dialog enter, or verify that registration information is
correct, and click Next
- At the Network dialog enter proper configuration options (see below) to access
remote computer and click Finish
- Click Close to close Add New Snap-In Dialog
- Click OK to close Add/Remove Snap-in... dialog
- Click on a newly created Snap-In node to connect and work with remote computer
- If something is not configured properly, error messages appear (see
Important section below), and you can go to Snap-Ins properties and change
Network settings to solve the problem (see section above).
- After you finish new Snap-In configuration, you can save Console for the future use
(menu item Save in Console menu).
Network Configuration Options:
- Connect to Machine - whether you will be connected to Local or Remote
computer.
- Local you will connect and see drives on a local machine
- Remote type machine name to connect to, and after Refresh command you will
see remote drives
- Remote Access - you can specify the account, which will be used to connect to
remote instances of Active@ UNDELETE:
- Relies on DCOM configuration no explicit account is specified. Everything depends
on how remote COM server is configured
- Log On as User type user name and password you want to use to connect to the
remote server.
- Local Machine DCOM Configuration - you can run standard Windows utility
DCOMCNFG.EXE where you can specify how instance of Active@ UNDELETE on your computer
will
be accessible by other users in the network. See Understanding DCOM for more information.

Computer Management Console
Another way to connect and work with remote computer is using standard Computer
Management console.
You can go this way only if both operating systems on your and remote computer support Computer Management (for example both machines have Windows 2000 installed).
To connect and manage remote computers:
- Start Computer Management console by one of the following methods:
- Right click My Computer desktop icon and click Manage menu item
- Run "Computer Management" from "Administrative Tools" folder in the menu or Control Panel.
- Right click the Computer Management node and click "Connect to another
computer..." menu item or select it from the Action menu
- Select one of available computers, or type its name in the Select Computer dialog and click Ok
- Active@ UNDELETE icon appears under System Tools node in Computer
Management. Expand Active@ UNDELETE node and work with remote computer the same way
as with a local machine.

- If Active@ UNDELETE is installed and registered on the remote computer, you have an
access to the remote computer and DCOM is configured properly, you should be able
to
perform all procedures the same way as you work locally.
- If you mistyped remote computer name, or software is not installed properly, most
likely you'll get a COM error The RPC Server is not Available.
- If you do not have enough privileges on a remote computer, most likely you'll get
an
error Access denied.
- If your did not turn off DCOM security (its turned on by
default) you should configure it properly, otherwise you'll get an errors and warnings
like:
- Access Denied
- DCOM security settings do not allow this process to get notifications from the
remote server
See DCOM Configuration section for more
information on how to configure DCOM properly. For testing purposes, you can try to turn off DCOM security temporarily, by setting on both computers Default Authentication Level to (None), and adding Everyone to Default Access and Launch permissions.
- For more information on how to configure DCOM see DCOM Configuration section.
- For more information on how to create and configure MMC Consoles, Add/Remove Snap-Ins see MMC Consoles section, or Microsoft Management Console Help.

