Active@ UNDELETE Ver 2.0
See documentation for latest version
If the deleted file or folder is identified with a gray icon, the entry in the Root Table or MFT and the file clusters have not been overwritten, and you have a good chance to use this method and recover deleted contents successfully. A chain of clusters is defined based on information found in Root Tables or MFT combined with some empirical algorithms. When a folder location is defined for constructing files from this information, the contents of these clusters is written to that folder.
When the folder is recovered, all folder contents - together with subfolders - is restored recursively to the defined folder.
It is simple and intuitive to use this automatic feature for no-nonsense recovery. For example the standard Drag and Drop, or Copy and Paste operations can be used to recover files. Please see Restoring Deleted Files and Folders for more details.
Automatic recovery relies completely on the logic implemented in the software and does not provide any flexibility over the process of recovery. If software displays a recovered file with a black icon, the contents of the file may have been damaged or overwritten with other data. The second, overwriting file might also have been deleted. Using advanced features, if the file contents are readable, it is possible to attempt to reconstitute the file manually from the traces of data and then recover the file, partially or completely.
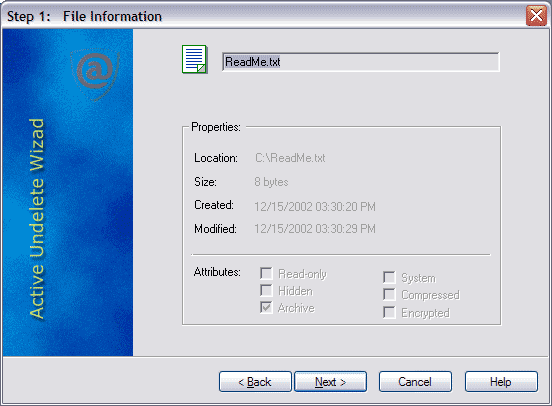
The following steps will take you through a version of Advanced Data Recovery with the Undelete Wizard:


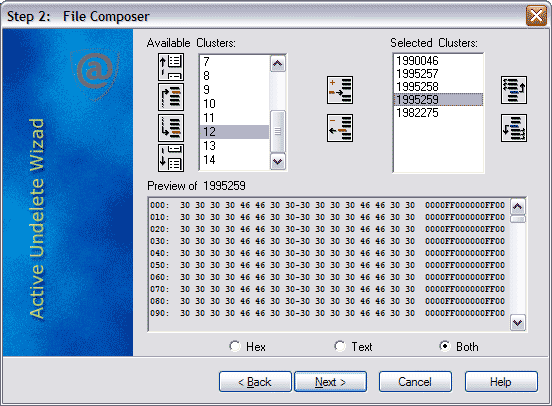
Available Clusters Shows the allocated file clusters by number. Click these to move them to the right-hand pane. Clusters occupied by data from other files are colored black. Unoccupied, or free clusters are colored red. Grey-colored clusters are those that have been selected for recovery.
Find Previous and Next unoccupied cluster using the Scroll Up or Scroll Down icons.
Contents of clusters selected in this box will be displayed in the Preview pane, below.
Selected Clusters Displays clusters as they are selected from the left-hand pane.
Assemble these clusters in order so that the contents of the file makes logical sense.
Select clusters by number and click Add or Remove icons to edit the contents of this pane. Similarly, click Move Up or Move Down icons to re-arrange the order of these clusters.
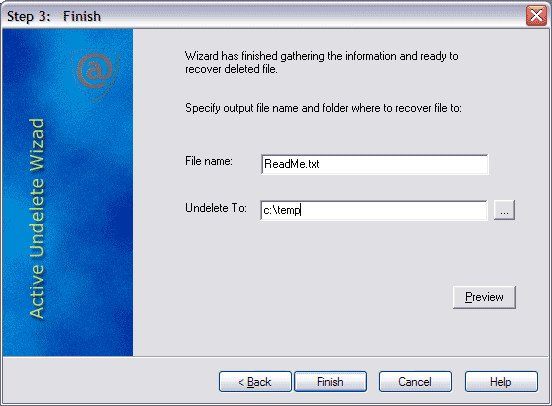
Once assembly of the file body is complete, click Next to complete the recovery process. The Finish screen appears.

On this screen, change the path and name of the file to be recovered. Save a recovered file to a location different from that of the original data. For more information on this topic, please read the next section. If Automatic Data Recovery fails to recover file contents properly, changing the File name to a simple format like *.txt, *.log or *.rtf can make the file easier to recover.
Preview the file using default viewer. After all output parameters have been defined, click Finish to complete recovery process.
For more information on sectors and clusters, please see Hard Disk Drive Basics.