Active@ UNDELETE Ver 7.0
See documentation for latest version
Application Preferences
You can change many of the settings that affect the application's behavior in the
Preferences dialog box.
To open the Preferences dialog box, do one of the following:
- From the Tools menu, select Preferences
- In the Application toolbar, click Preferences
A description of the tabs in this page follows below.
General
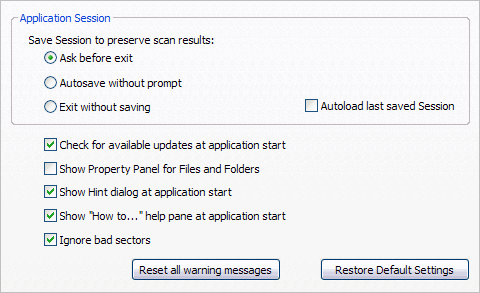
- You may set default activities that happen when the application starts or exits:
- To show a warning before saving the current session when you exit, click Ask
before exit.
- To save the session without a warning when you exit, select Autosave without
prompt.
- To exit each time without saving, select Exit without saving.
- To load the previous session data each time you start, select the Autoload last
saved session check box.
- To connect to the Active@ UNDELETE site and check for application updates each time
you
start, select the Check for available updates check box.
- To display the property panel each time you start, select the Show Property Panel for
Files and Folders check box.
- To show hints about the application each time you start, select the Show Hint dialog
at application start check box.
- To automatically skip over bad sectors when scanning the disk or recovering files,
select the Ignore bad sectors check box.
- To discard all custom General settings and restore defaults, click Restore Default
Settings.
Recovery
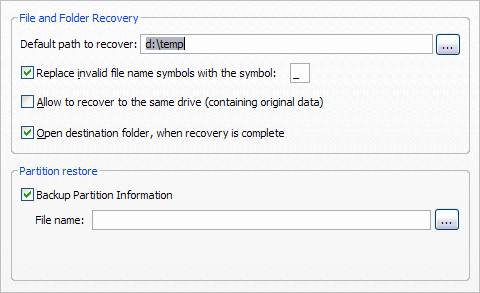
- To set the default path to the folder where you will save recovered files, enter the
path in the Default path to recover field. You may also click the ellipsis button
(…) and navigate to this folder.
- To automatically replace invalid characters in a recovered file name:
- Select the Replace invalid file name symbols check box.
- Enter a valid character in the field. The standard character is underscore (_).
- To save recovered files and folders on the same drive as the source data, select the
Allow to recover to the same drive check box.
- To open the destination folder after you recover files and folders, select the Open
destination folder check box.
- When you restore a partition, to automatically save a backup file before you restore:
- Select the Backup Partition Information check box.
- Enter the path and the default file name for the backup file in the File name field.
You may also click the ellipsis button (…) and navigate to the folder and then enter
the file name.
We strongly recommend that you do not write recovered files and folders
to the same hard drive as the source data.
Tools
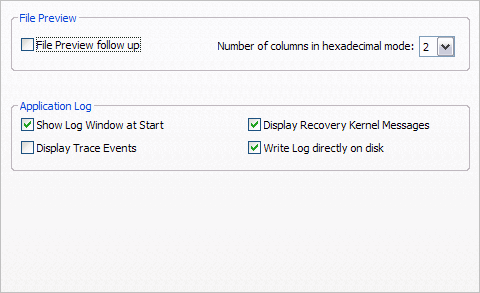
- In File Preview:
- To attempt to preview an image file each time you select a new file, select the
File Preview follow-up check box. To attempt to preview an image file
manually each time, clear this check box.
- To show non-image files in the image viewer in hexadecimal mode, from the Number
of columns in hexadecimal mode drop-down list, select the number of
columns.
- In Application Log:
- To show the Application Log view when you start, select the Show Log Window at
Start check box.
- To record all system events in the log, select the Display Trace Events check
box.
- To show recovery messages from the system, select the Display Recovery Kernel
Messages check box.
- To automatically write the log to a file, select the Write log on disk check
box.
If you display all system trace events in the application log, the log file will quickly become very large.
Hex Editor
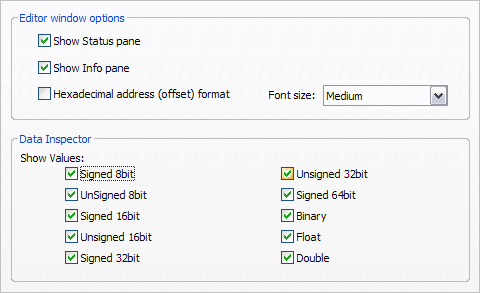
Hex Editor uses a simple, low-level disk viewer which displays information in binary and text modes at the same time. You can use this view to analyze the contents of data storage structure elements.
The Data Inspector is part of the Hex Editor and displays whatever is currently under the cursor. It does so in ten different formats. This may help you interpret data as displayed in Hex Editor.
To set Hex Editor options:
- To show the Status pane by default, select the Show Status pane check
box.
- To show the Info pane by default, select the Show Info pane check box.
- To display the current address offset in Hexadecimal format, select the Hexadecimal
address check box. To display the current address offset in decimal format, clear
the Hexadecimal address check box.
- To set the font size, choose a size from the Font size drop-down list.
- In Data Inspector, select the check box next to all the formats of values that
you want to display. Clear the check box next to formats that you do not want to
display.
Recovery Toolbox
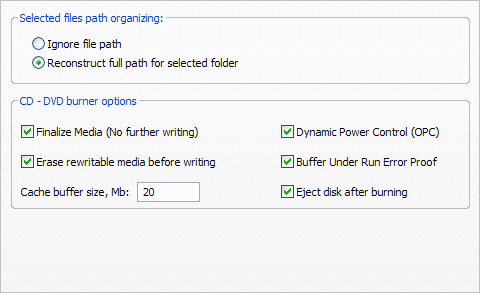
- To display the file path of selected files, select Reconstruct Full Path. To leave
the
path information blank, select Ignore file path.
- In CD – DVD burner options:
- To allow no further writing to CD or DVD media after restoring files, select the
Finalize Media check box.
- To wipe erasable media before writing restored files, select the Erase rewritable
media check box.
- To set the cache buffer size, enter a size in the Cache buffer size
field.
- To monitor and maintain the quality of disc writing (newer disc writers) select the
Dynamic Power Control (OPC) check box.
- To prevent buffer under run errors when writing to CD/DVD, select the Buffer
Under RuN Error Proof check box.
- To eject the CD/DVD after burning, select the Eject disk after burning check
box.


