Active@ UNDELETE Ver 5.0
See documentation for latest version
Create disk image wizard
This wizard will helps to create Logical Disk Image (default extension - .HDD) or Physical Device Image (default extension - .DIM
To start this wizard you have to select either Logical Drive or Physical Device for which you wish to create Disk Image and then run the wizard y doing one of the following:
- Click the Create Disk Image button on the toolbar, or
- Click Tools > Create Disk Image in command toolbar, or
- Right-click the selected drive, and click Create Disk Image on the context menu
After the wizard start, follow the simple instruction on each proceeding screens:
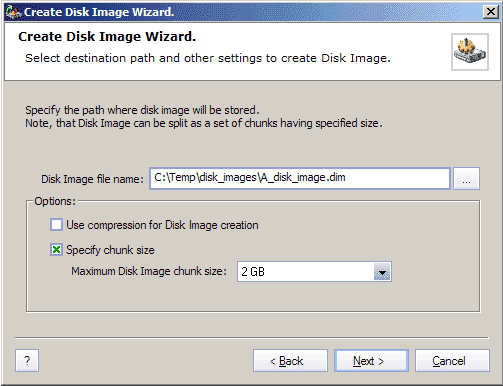
Step 1. Set Disk Image Options

Where:
- Disk Image file name
- Specify file name under which the newly created image will be stored.
- The Target Location for the Disk Images must always be on other drive.
- File systems FAT16 and FAT32 do not support file sizes larger than 2GB and 4GB
respectively. In these file systems is not possible to create a disk image file
for a drive as it is likely to grow larger than 2GB (or 4GB). The solution in this
case is to use a target location formatted under the operating system Windows
NT/2000/XP and NTFS or create Disk Image split into several parts(chunks) by
appropriate size.
- Use compression for Disk Image creation
- With this option on, the final Disk Image creates compressed - that will save some
space on your HDD but makes your Disk Image less useful for further Data Recovery
operations.
- Specify chunk size
- Image can be created as one solid file as big as original disk (if Specify chunk
size not set) or stored split on chunks of size specified.
After complete this page, press Next button to proceed.
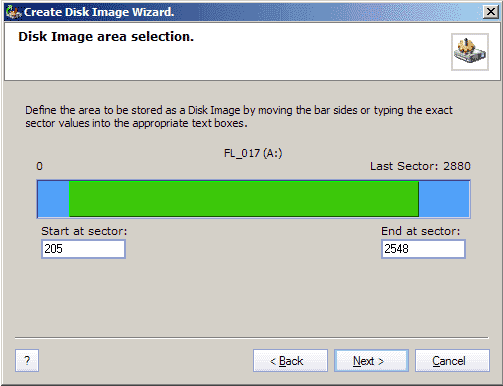
Step 2. Select Area of a Disk

You can make the Disk Image not of entire disk, but only part of it. On this page
you can specify this area in two ways:
- by pressing and dragging edges of selected area in picker control, or
- entering exact first and last sector of selected area
After complete this page, press Next button to proceed.
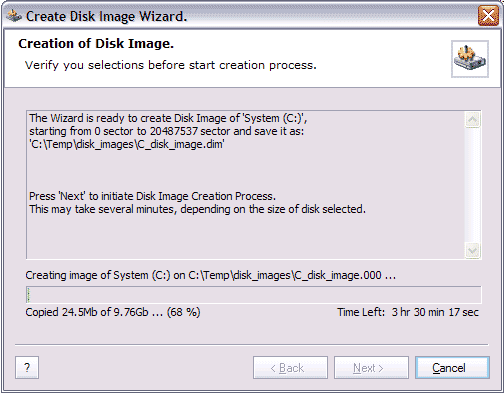
Step 3. Confirm Disk Image Creation

Here, you can watch the process of Disk Image creation. You can cancel the process any time by clicking Cancel button.


