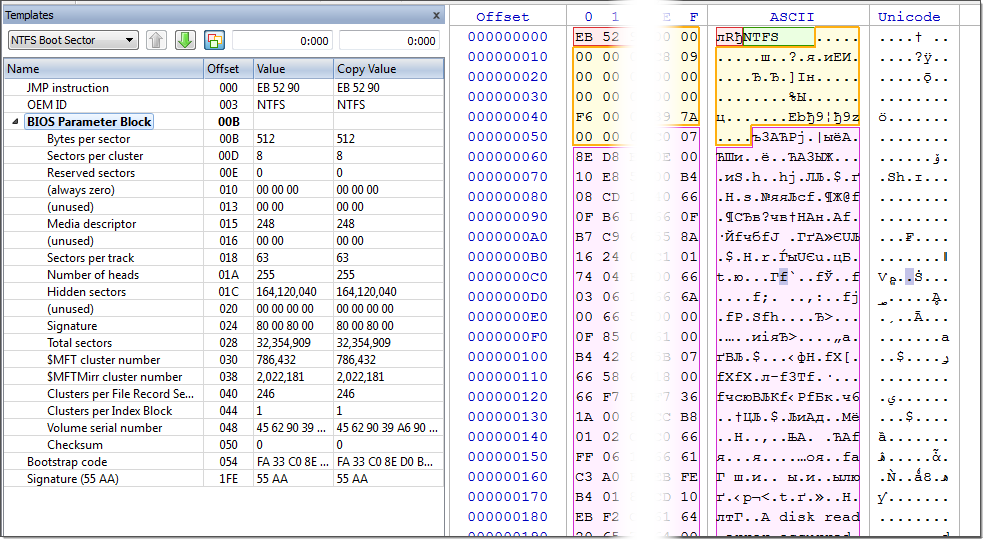
You can edit system records (like boot sectors, MBR, MFT etc.) by using a template tool window. Template window is a small dockable window normally located to the left from main Disk Editor editing area. If it is not visible, you can turn it on by selecting toolbar menu View > Templates.

In order to apply a template to the desired offset, move the cursor to the location and use Edit menu command Set Template position. You can select this command either from Edit toolbar menu or from a context menu. The next step select a required template from the list box with template names in the toolbar of templates window.

When you are jumping to particular system areas using Navigate menu, the corresponding template might be applied automatically. This is true for templates like boot sectors, MBR or MFT record but not all access points have a template associated with them.
The following templates are supported:
As you edit data in Hex, ASCII or Unicode pane or in Templates window, modified data is fully synchronized between views. After each modification a template view is recalculated giving you an up-to-date interpretation of data.
The following templates have their copy:
In this case template window will have an additional column named Copy Value which contains the data from the copy record. Template copies are useful to compare record located in different locations using the same pattern, for example to compare a boot record with its copy.
In case of Copy template its location is set separately from a main record using the same pattern. If the main template and its copy are intersecting, the copy template data will be shown in template window but not highlighted in the main edit area.
In order to set a template position or change an existing one move the cursor to desired location and use Edit menu command Set Template position (or Set Template Copy Position for its copy).
Navigating to a system area which has an attached template using Navigate menu also changes template position.
In order to facilitate the movement between records located in sequence, use arrow buttons located in the template window toolbar next to the templates list. For example, if you are editing or viewing an MFT record you can easily move to the next or previous record using those buttons.
Another way to set a template position is to enter new offset directly into template offset edit field in the template window toolbar. One of those fields are used for entering an offset of the main record and another is for its copy. The format of offset used in offset field is <sector:>:<sector offset>. You don't need to specify sector offset if you want to move to the beginning of the sector. For example, you can simply enter 100 to go to sector 100 and template offset will be shown as 100:0, but if you need to specify 128 byte in sector 100, you have to enter 100:128.
By default all individual fields of template record are highlighted in Disk Editor main area (in hexadecimal and ASCII columns only). This coloring highlighting can be disabled by clicking Toggle template fields coloring button in template window toolbar next to arrow buttons.
The colors used by template coloring are arbitrary and have no specific meaning, their main purpose is to make separate fields visible and distinguish from each other. Actually, a palette of several colors is chosen and colors are used in a circle. When you select a field in the template window, the current field is also highlighted in hex editing area with bold field frame.
When you move a mouse cursor above colored field in editing area, the name and value of the corresponding field is also shown in a tooltip.
You can set the cursor (current position) to a particular field in a template by double clicking it. If you double click in Name, Offset or Value column, the position inside the main record is selected, but if you click inside Copy Value column, the navigation is performed to the field in template copy.
Please note, that in Edit mode double clicking inside of Value or Copy Value starts editing of the field instead of navigating to that field.
Double click in the Value or Copy Value column to start editing the field (make sure that Allow Edit Content is enabled).
Some of the fields are edited according to the mask and will not allow to enter invalid values. For example, you cannot enter the number bigger than 65535 when editing a 2-byte field or invalid date when editing a date.
To exit the editing of the field with saving the result of edit, press Enter or click to another field. To exit editing without saving the result and revert to original value, press Esc.
Some of the templates fields depend on other fields. When a template is selected, an initial parsing occurs. If some of the fields contain invalid values, the further parsing of the record might be not possible and parsing will be stopped at this point, resulting in incomplete record. As an example lets take an MFT record. The record header is always parsed, but if it contains invalid fields or update sequence, attributes will not be parsed. The same is true when parsing an attribute - if an error occurs, the further parse is canceled and no subsequent attributes are added to the record.
Furthermore, the whole set of fields for the template might depend on some field values. For example, FAT Directory Entry template will show a Short File Name Entry fields or Long File Name depending on the value of the flags.
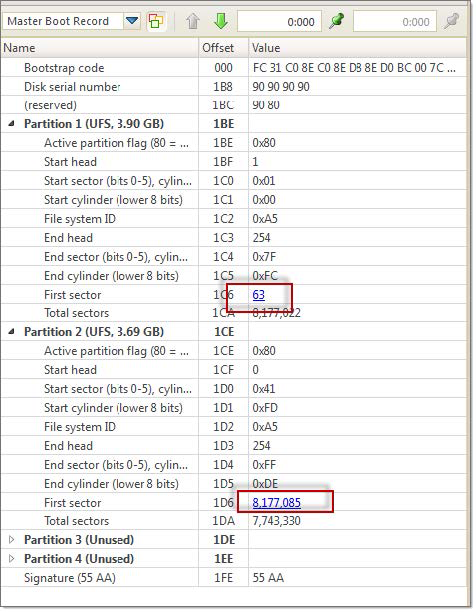
Many templates contain hyperlinks allowing navigate easily to important data points.
For example, MFT records contain links to first cluster in data runs and MBR provideslinks to partitions.
