Active@ UNDELETE ver. 12
Most recent version
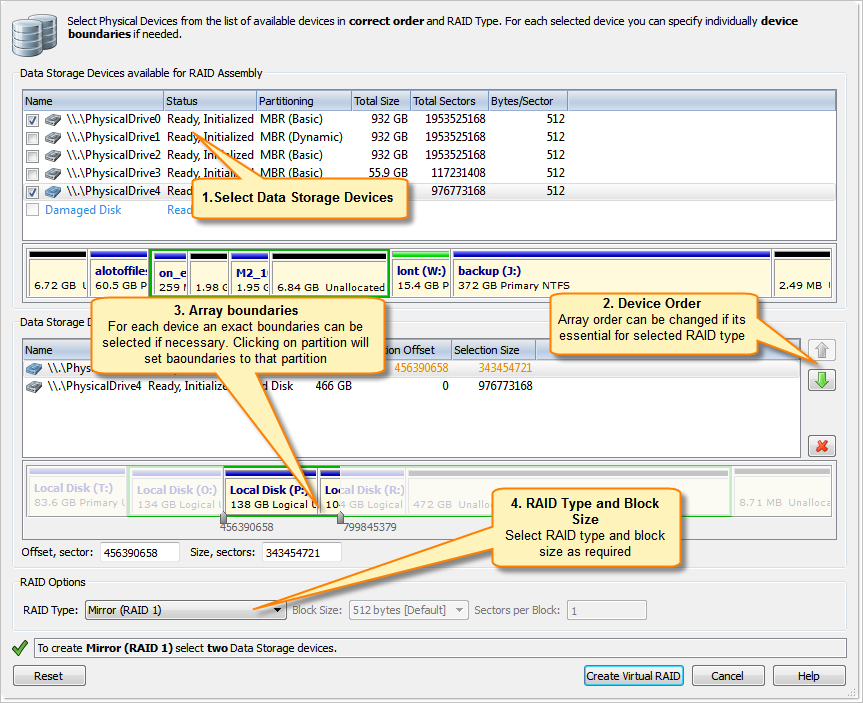
Virtual RAID assembly
To open the Virtual Disk Array Assembly dialog, do one of the following:
- From the Tools menu, choose Create Virtual RAID (RAID) command.
- From the Tools tab in Command Bar, choose Create Virtual RAID command.
To assemble virtual RAID follow the steps:
Select source disks
To add disks to virtual RAID Assembly:
- Double-click a disk in the Available disks list to move it to the Selected disks list.
- Use check marks to add disk to the Selected disks list.
To remove disks from Selected disks list:
- Double-click a disk in the Selected disks list.
- Click a disk in the Selected disks list. To remove it, click Remove.
Define disks order (optional)
To change the order of a disk in the Selected disks list, select it and click Move Up or Move Down.
Adjust disks boundaries (optional)
For each selected disks offset and size can be defined to specify part of a disk used in RAID assembly. By default entire disk is used in disk array.
Specify the virtual array type
Select one of the supported RAID types:
- Simple volume;
- Spanned array;
- Mirror (RAID-1);
- Stripe (RAID-0);
- RAID-5 (left asynchronous) - default value;
- RAID-5 (left synchronous);
- RAID-5 (right asynchronous);
- RAID-5 (right synchronous);
Set additional options (if required)
In Block size, specify the stripe block size in kilobytes (Required for
Stripe and RAID-5 arrays only)
Click Create Virtual RAID
Result
As a result, assembled virtual RAID must appear in Recovery Explorer view as a device, ready for scan or other actions applicable for virtual devices.
See Also:
Disk Arrays (RAID's)