Active@ UNDELETE ver. 2
See documentation for latest version
Advanced file recovery feature includes previewing file contents and file cluster's chain manipulation before restoration occurs. It can be helpful when standard Undelete command can not successfully recover file because it's being partially overwritten with other data. Undelete Wizard allows you to see and view contents of clusters composing the file, you can add, remove, change clusters in place, thus composing file body manually before recovering. However it will help you for the only files having readable format, like *.txt, *.log, *.rtf ... files.
To use advanced file recovery feature:


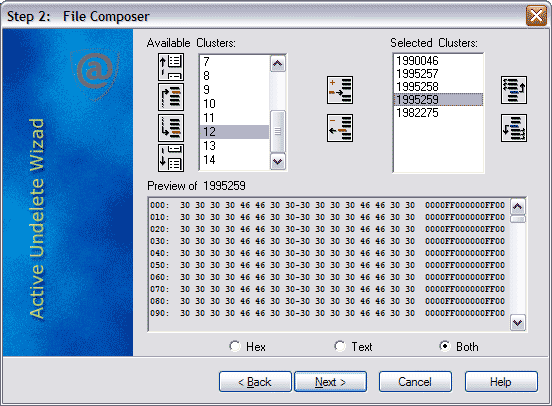
At the left side there is a list of all available drive's clusters. Clusters occupied by other files data have black color, like cluster 21930 in this example. Unoccupied, or free clusters have red color, like cluster 21936. Grey color have clusters selected for the recovery. At the right side there is a list of clusters composing file body. These clusters will be recovered later on. If you click any cluster in any list box, it's contents is displayed at the Preview pane below, where you can see it in Hex format, in Text format or mixed format, like on example above. You can switch between these formats using radio buttons.
Image buttons help you manipulate the clusters: 
 Page Up and Page Down buttons for Available Clusters list
 Find previous and next unoccupied cluster on the drive starting from the current position
 Buttons allows to
Add and Remove current cluster to and from the Selected Clusters list
 Move current
cluster in the Selected Clusters list one position Up and Down.
When you examined clusters, and composed file body, click Next to finish recovery process.
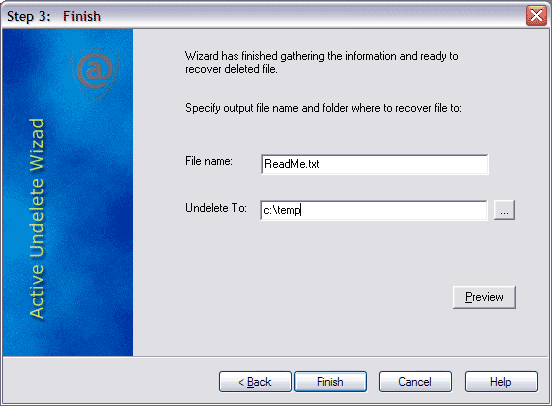
 When you defined all output parameters, click Finish to complete recovery process.
For the safety reasons, the utility does not allow you to place the restored file into the same drive by default, because a newly created file should not overwrite the file under recovery (or a part of it), or the contents of the other deleted files. Always restore files to another logical, removable, floppy or network drive. However if you do not have a choice, go to configuration and turn on the option that allows you to restore file to the same drive.