Active@ UNDELETE ver. 7x
See documentation for latest version
Recover file to CD or DVD
To recover (burn) Files and Folders to CD\DVD they needs to be collected in Recovery Toolbox first. Using Recovery Toolbox you can mark file to recover from different locations and burn them at once to single CD or DVD.
To collect files in the Recovery Toolbox, select the check box next to the file name or folder name in Recovery Explorer view, Document View or in Search Result view. Folder hierarchy for selected files are preserved in the Recovery Toolbox.

Information panel at the bottom of Recovery Toolbox view shows space allocation for selected media. Using this panel you can evaluate is it enough of free space on drive or CD\DVD you selected to recover all files.

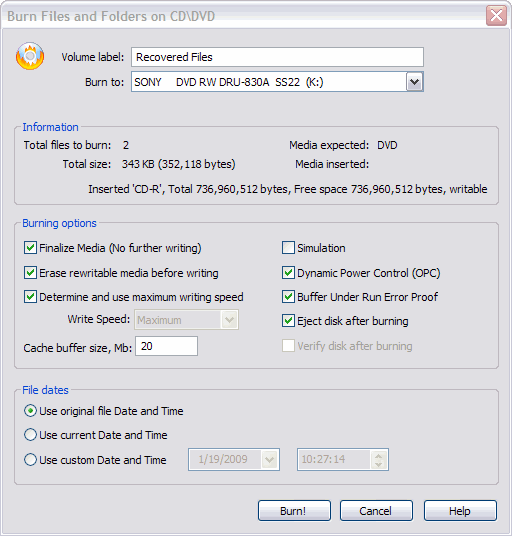
Click Burn button in Recovery Toolbox View. The Burn Files and Folder on CD\DVD dialog box appears.

- Enter Volume label
- Select burning device from Burn to drop-down list. If ISO Image Recorder
selected as burner, then ISO file will be created in destination location instead.
- Specify burning options:
- To allow no further writing to CD or DVD media after restoring files, select the
Finalize Media check box.
- To wipe erasable media before writing restored files, select the Erase rewritable
media check box.
- To set the cache buffer size, enter a size in the Cache buffer size field.
- To monitor and maintain the quality of disc writing (newer disc writers) select the
Dynamic Power Control (OPC) check box.
- To prevent buffer under run errors when writing to CD/DVD, select the Buffer Under
RuN Error Proof check box.
- To eject the CD/DVD after burning, select the Eject disk after burning check
box.
- Specify file dates and click Burn button to start burning process
- To terminate the burning process, click Stop button at any time on follow up
process dialog. Results may be not accurate or complete.


