A wildcard is a character that can be used as a substitute for any of a class of characters in a search. Wildcard characters are often used in place of one or more characters when you do not know what the real character is or you do not want to enter the entire name. In Active@ UNDELETE three types of wildcard are used: star or asterisk(*), question mark (?) and number sign (#).
Examples of using wildcards:
| Wildcard character | Example | Description |
|---|---|---|
| Asterisk (*) | Example | Description |
| Asterisk (*) | docum* | Use the asterisk as a substitute for zero or more characters if you are looking for a file that you know what it starts with and you cannot remember the rest of the file name. The example locates all files of any file type that begin with "docum" including documents.txt, document_01.doc and documentum.doc. |
| docum*.doc | To narrow the search to a specific type of file, include the file extension. The example locates all files that begin with "docum" and have the file name extension .doc, such as document_01.doc and documentum.doc. | |
| Question mark (?) | doc?.doc | Use the question mark as a substitute for a single character in a file name. In the example, you will locate the file docs.doc or doc1.doc but not documents.doc. |
| Number sign (#) | doc?.doc | Use the question mark as a substitute for a single character in a file name. In the example, you will locate the file docs.doc or doc1.doc but not documents.doc. |
| Number sign (#) | doc_###.doc | Use the number sign (also known as the pound or hash sign) as a substitute for a single number in a name. In the example, you will locate the file doc_012.doc or doc_211.doc but not doc_ABS.doc. |
Regular expressions are special search patterns, more capable then wildcards to define search criteria.
Examples of using regular expressions:
^\d\d?$ — match integers 0 to 99
^\S+$ — match strings without white space
\b(mail|letter|correspondence)\b — match strings containing 'mail' or 'letter' or 'correspondence' but only match whole words i.e. not 'email'
&(?!amp;) — match ampersands but not &
\b(Eric|Eirik)\b — match Eric or Eirik
This log view monitors each action taken by the application and displays messages, notifications and other service information. Use the messages in this screen to observe and further understand the flow of the recovery process.
To open and activate Application log view do one of the following:
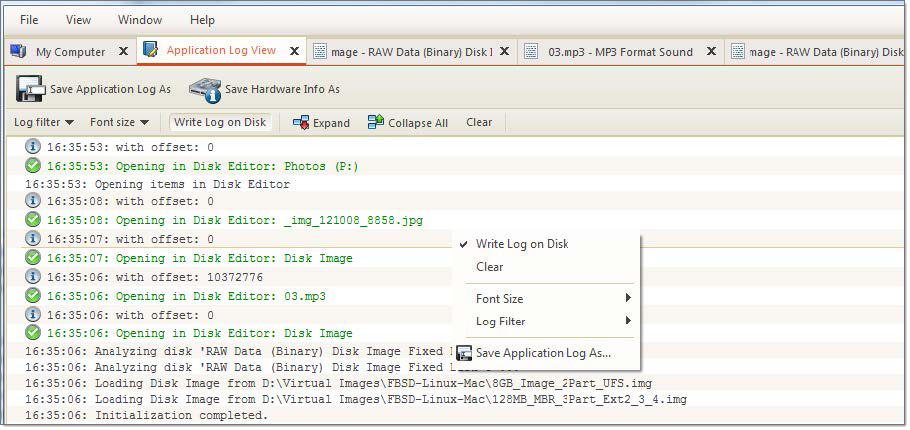
Figure 74: Application log view
To prepare a log file, turn on Display Trace Events and Write Log on Disk options in the Application preferences.
It is best to save the log file to a physical disk that is different from the disk that holds the deleted data. By doing this, you reduce the risk of writing over the data that you are trying to recover.
Show or hide specific entry types in log view:
Show non-critical warning entries
Show advanced entries related to application behaviour and data analysis
Duplicate console entries into main log view
Show entries related to operating system activity and state
Change size of mono-space font used in log view for better experience
Writes log entries in dedicated file on disk, located in application directory. Off by default.
Expand or collapse all log entries respectively
Clear log for current application sessions
Tip: We recommend that you attach a copy of the log file to all requests made to our technical support group. The entries in this file will help us resolve certain issues.
Additional log view (pane) to show log entries related to active feature view to display active process (e.g. file recover or disk scan) entries and urgent (critical) messages.
Selected item properties
To show detailed information about any subject of an application, such as disk, partition, volume, file etc use information views. In general, when open it follows selection changes and show information about selected item automatically. Besides only displaying valuable data it also allows you to copy that information into the clipboard by using context menu commands.
copy only value of selected field in the information view
Copy formatted name and value field pair
Copy all information as formatted set of name and value pairs.
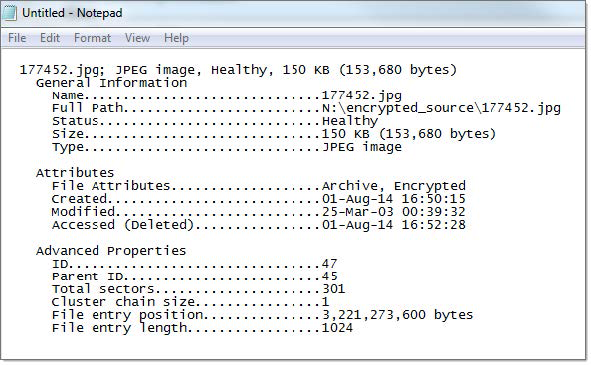
Figure 75: Example of copied information about file
To show property view for selected item do one of the following:
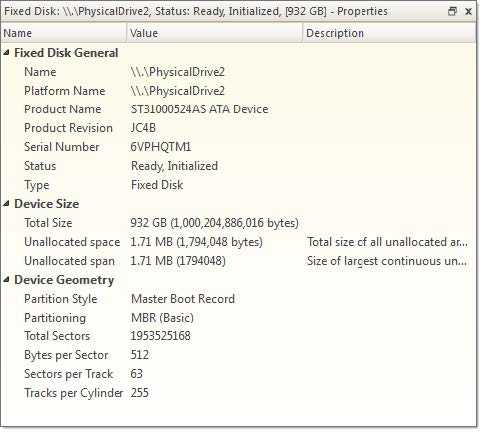
Figure 76: Property view example
Another information view that displays SMART (Self-Monitoring, Analysis and Reporting Technology) data of selected hard drive, if supported. To show this view:
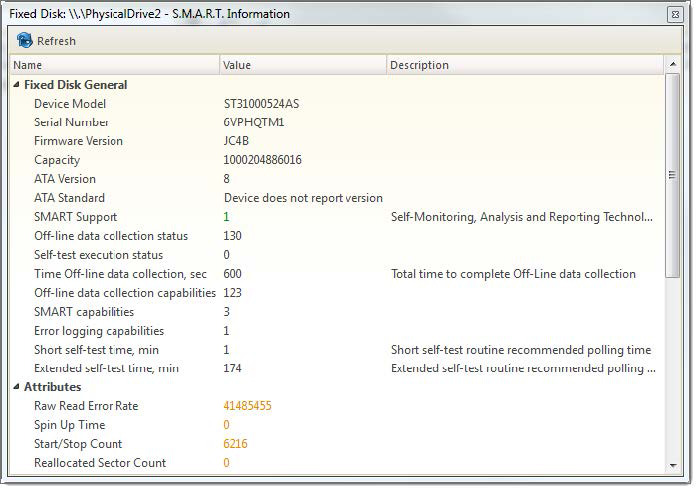
Figure 77: SMART information for physical device example
If you want to contact our technical support staff for help with file recovery, a file that contains a summary of your local devices is helpful. Active@ UNDELETE allows you to create a summary listing file in XML format. This data format is “human-readable” and can help our technical support staff analyze your computer configuration or point out disk failures.
To create a hardware diagnostic file from the File menu, click Save Hardware Info As... command.
Note: To save time when contacting our technical support staff, we highly recommend that you provide us with a hardware diagnostic file.
You can change many of the settings that affect the application's behavior in the Preferences dialog. To open the Preferences dialog, do one of the following:
See description of each tabbed preferences page below
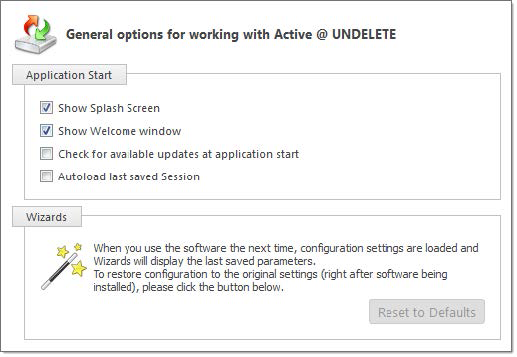
Enable\Disable splash screen at application start.
Show\Hide welcome dialog at application start.
Each time when Active@ UNDELETE starts it will request for available update\upgrade and prompt for download if newer version is available for download.
When this option is on, at application start Active@ UNDELETE will load latest saved session state, such as environment configuration, opened Disk Images and Scan Results. See Using scan results
Restores original wizard settings and page sequence to default state.
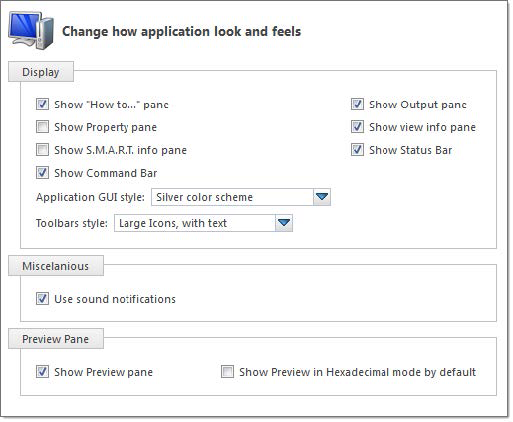
Show\Hide left side context help panel. Context help will automatically changed when active view (tab) is changed to show related hints and brief description of every view.
Show\Hide selected item property pane.
Show\Hide SMART information pane for selected physical device. Displayed only for SMART compatible devices.
Show\Hide right side command bar that contains shortcuts to most usable commands and actions.
Show\Hide output (console) pane — simplified version of Application Log view.
Show\Hide property pane contains attribute and properties for current view, e.g. search criteria for search result view.
Show\Hide application status bar
Switch global look-n-feel application style.
Toggles toolbar icon and text styling.
Enable\Disable application sound notifications.
Show file preview pane by default
When this option is on, file preview by default will be always shown in hexadecimal mode without any attempt to load it as an image or a document.
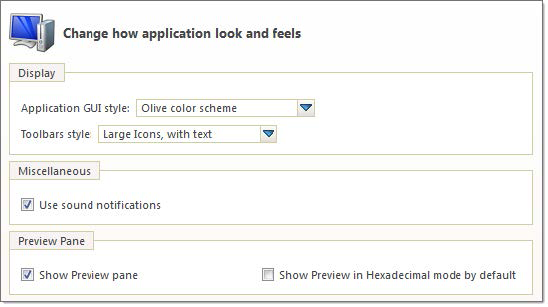
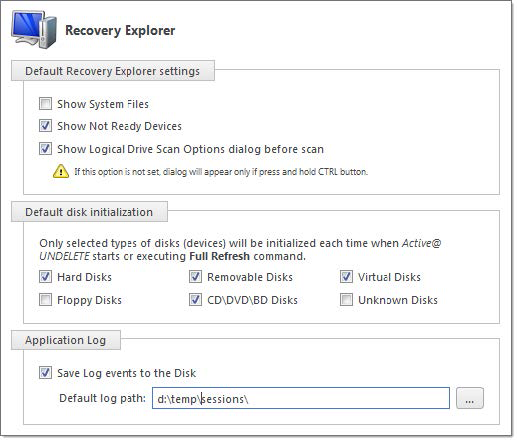
Show\Hide system files in Recovery explorer. In most of the cases these files are not recoverable.
Show\Hide devices that has not read state and can not be scanned.
When this option is OFF, double click logical drive (volume) node in Recover Explorer view will initiate scan with default (most usable) options. Only when CTRL button is pressed down at the same time or this option is off, Scan Volume dialog will appear and let you to change scan options.
Specify devices type that will be initialized at each application start and will be displayed in Recovery Explorer.
Enable\Disable saving log entries to the file. Use Default log path to specify log file.
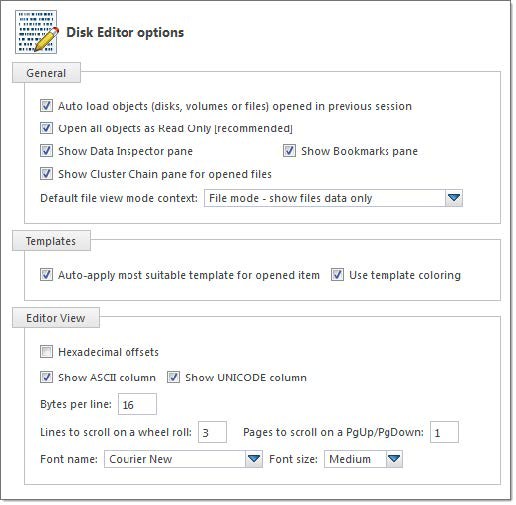
Load (open) edited objects in Disk Editor at each application start if they present in system.
Open objects in Read Only mode by default.
Show\Hide Data Inspector pane by default
Show\Hide Bookmark pane by default
Show\Hide Cluster Chain pane for edited files by default.
Toggles default file view mode - files can be viewed as data
If this option is ON, then most suitable data structure template for opened object will be applied and set visible.
Toggle between template coloring or transparent template fields presentation.
Toggle between decimal and hexadecimal offset format
Show\Hide ASCII decoding column
Show\Hide UNICODE decoding column
Defines bytes per line representation. Minimum 8 bytes and maximum 255 bytes per line.
Number of lines on each single mouse wheel scroll action.
Pages to scroll on each PageUp or PageDown keyboard button action.
List of mono-space font faces available in system to use in Disk Editor view.
Toggle between relative font size.
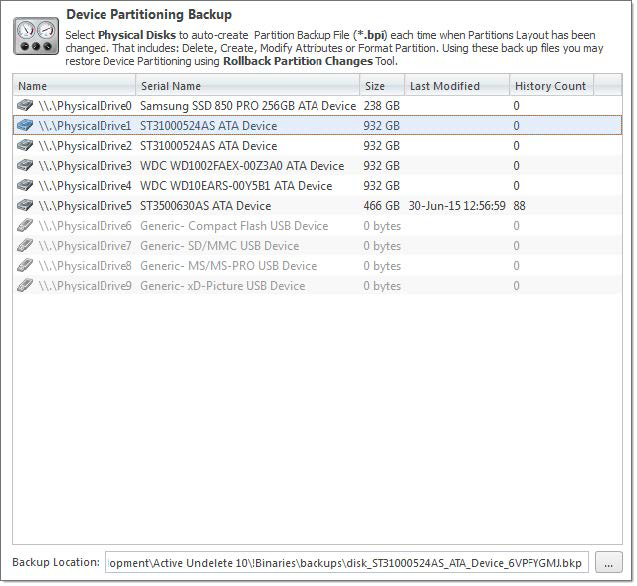
Define individually Physical Device (disk) backup file location. See Rollback partition changes on page 115 for details.
Review available (supported) file signatures. User defined file signatures (if any) are shown in separate group.
Click Add button to add user define file signature. See Custom (user defined) file signature templates
Click Edit button when custom file signature is selected or double click custom file signature node to open edit dialog.
Click Import button to import custom file signatures define in third party configuration file