Using Active@ UNDELETE you can create a Disk Image of a volume (logical drive) or a disk (physical device). To create disk image:
 from main menu;
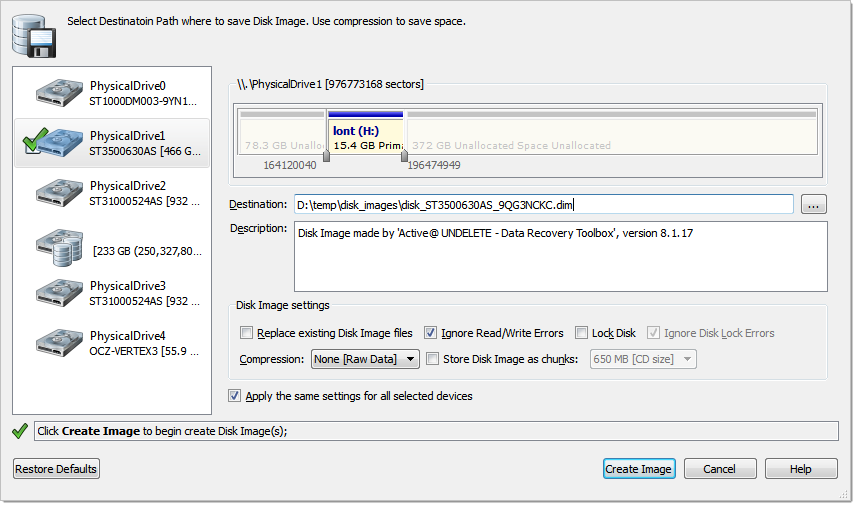
Multiple disk selection
Additional areas on other disks can be selected in the Physical Disks list to be processed simultaneously. At least one selection must be made to begin disk image creation.
Disk Control
Use markers that indicates the first and last sectors on this control to specify an area to image.
Destination
Provide location of Disk Image configuration file. To browse to the path, click the ellipsis button […]. All Disk Image chunk files will be created in the same folder with DIM file.
Description
Enter a brief description about this disk image for future reference. Optional.
Replace existing disk image files
If this option is set, all chunk files will be replaced with a new once if their file names are the same.
Ignore R\W Errors
Ignore Read and Write errors during the disk image creation.
Lock Disk
Source disk will be locked until Disk Image creation is complete or aborted;
Ignore Disk Lock Errors
Any errors related to disk lock will be ignored;
Compression
Choose one of the following:
Store Disk Image in chunks
Select this check box to save the Disk Image as a series of files with a specified size. Choose the file size from the drop-down list. This option may be useful if you want to write the Disk Image to CD-ROMs or DVD-ROMs. By default this check box is cleared and the Disk Image is stored in one large file;
Click Create Image to initiate disk image creation process with selected parameters.
Create image during the process:
The file extension for a Disk Image configuration file is .DIM by default.
The Destination Path for a Disk Image file must always be on another drive. File systems such as FAT16 and FAT32 do not support file sizes larger than 2GB and 4GB respectively. With these file systems it is not possible to create a Disk Image file for a drive as it is likely to grow larger than the size limit. The solution in this case is to do one of the following:
Use Create a Disk Image Wizard for the same purpose.