Create virtual RAID
To assembly virtual RAID:
1. Open the Virtual Disk Array Assembly dialog.
- From the Tools menu, choose Create Virtual RAID (RAID) command.
- From the Tools tab in Command Bar, choose Create Virtual RAID command.
Dialog Options
- RAID Type
- RAID type. See article: Disk Arrays (RAID's) for information about how to select proper RAID type.
- Block size
- Size of stripe block in bytes. Applicable only for stripe or RAID-5 array
types.
- Sectors per Block
- Size of a block in sectors
- Offset
- Offset of selected disk area from beginning if a disk in sectors.
- Size of selected area in sectors.
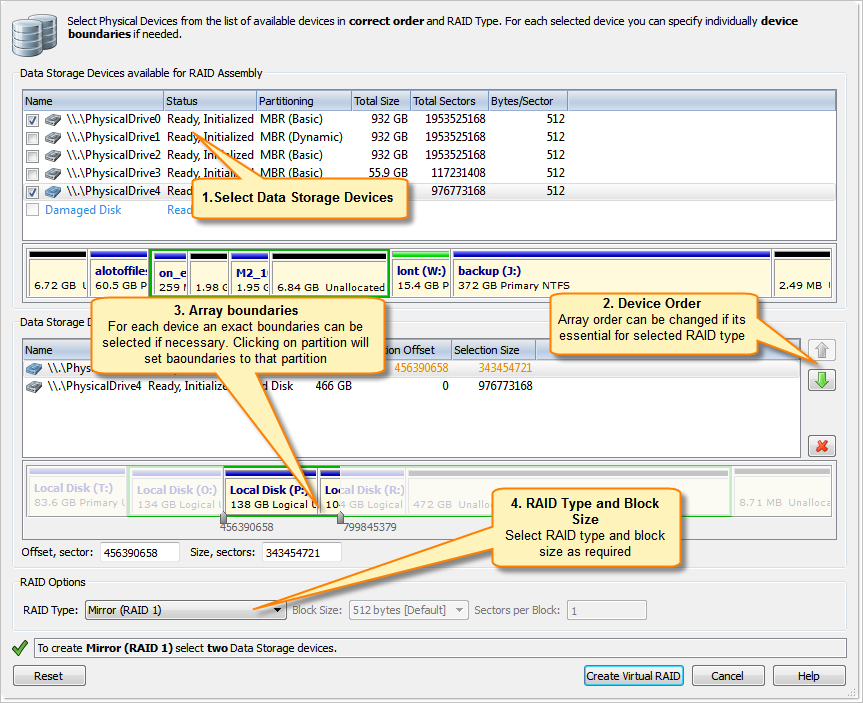
2. Select disks from list of Available Data Storage Devices by double-click or using check marks.
- Double-click a disk in the Available disks list to move it to the Selected disks list or select a disk in the Available disks list and click Add button.
- To change the order of a disk in the Selected disks list, select it and click Move Up or Move Down.
- To remove a disk from the Selected disks list double-click a disk in the Selected disks list or select disk and click Remove button.
- To remove all disks from the Selected disks list, click Remove All.
3. Specify used disk range.
- Drag sliders to desired position to mark used disk range or
- Enter exact values in Offset and Size text boxes
For each selected disk, used disk range can be set individually.
Click on disk partition or unallocated space to select entire partition or unallocated space to disk range for RAID assembly.
4. Specify RAID type, block size and sectors per block if necessary.
- In stripe block size text box specify the stripe block size in kilobytes (Stripe and RAID-5 arrays only).
- For RAID5 select a proper parity layout from drop-down list box. See Disk Arrays (RAID's) for parity layout reference.
5. Click Create. The Processing… dialog appears.
To display creation events and progress details, click Details.
To terminate the creation process, click Stop at any time. Results may be not accurate or complete.
If a virtual disk array is created successfully, a new node appears in
Recovery Explorer tree.
If a virtual disk array is not created, or if it is created with errors, return to 1 and try again with different disks, or with a different disk order and RAID options.
See Also:
Virtual RAID