You may open a Disk Image to browse for files and folders or to scan for deleted files and folders.
To open the Open Disk Image dialog, do one of the following:
Open disk image using Configuration file
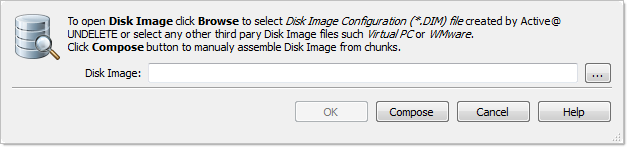
Use Browse button to locate .DIM (Disk Image Configuration) file. Once it selected, file ill be opened and presented with detailed preview of Disk Image information.
Click OK to open disk image or click Compose button to alter disk image configuration (see next step).
If there is no DIM file for Disk Image or to open third party Disk Images click Compose button.
Click OK to open Disk Image. A disk image node appears in Recovery Explorer.
Use Open a Disk Image Wizard for the same purpose.
Created Disk Images can be verified for integrity check by using Verify a disk image wizard or simply opened in Recovery Explorer and evaluated.
Disk image validation insures that a data storage disk image or a logical drive disk image is consistent internally and can be opened. We advise you to use this wizard to validate disk images created by third party applications.
When the Restore Partition wizard starts for the first time, the first screen describes the process. Clear the “Show this page next time?” check box to avoid seeing this screen the next time you run this wizard.
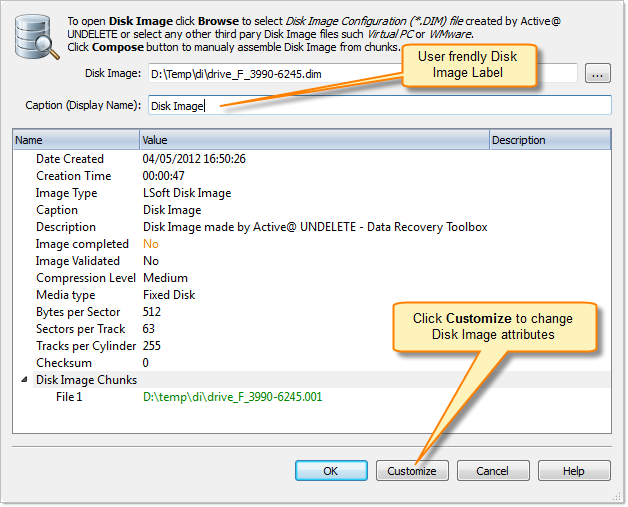
A Disk Image configuration File is a file, used to store all information about a created Disk Image including disk geometry and annotation labels. A Disk Image configuration File is created during the Create Disk Image procedure. You can select a Disk Image to be opened by specifying its Disk Image Configuration File. Type in the full path to this file in the edit box or use the browse button to open a 'Browse for file" dialog and to select this file.
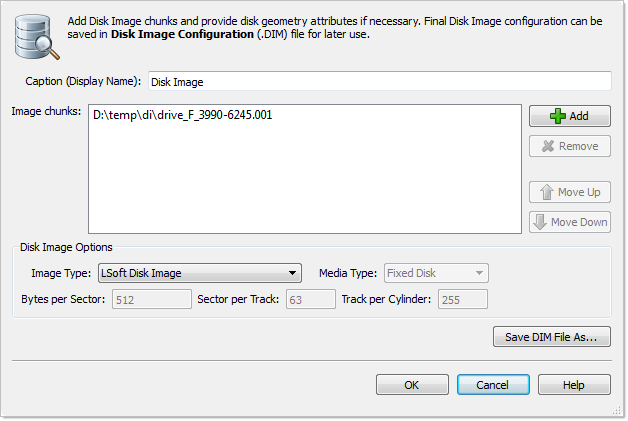
You can skip this step in order to assemble a Disk Image manually from chunks supplying all necessary options yourself.
Skip this step if disk image was opened using a configuration file (information is already entered), otherwise specify all parameters here manually.
Typically, a Disk Image Configuration File is used to open a Disk Image. This file contains necessary information about the Disk Image geometry, labels and other information. Nevertheless, a Disk Image can be open by specifying actual files (chunks) of an image and other options. This dialog can be also used to open raw Disk Images created by third party applications (such as WinHex for example) Caption Enter any label to distinguish newly opened disk image among other devices and disks.
A Disk Image consists of one or many files, which contains actual image data. A Disk Image can be cut into several files (chunks) during creation for better space allocation. In this list you have to specify all these files which make ups the image. To Add a Disk Image chunk to the list click the Add New button and use browse for a file dialog to select a file. To Remove a Disk Image chunk, select this chunk in the list and click the Remove button. To modify the order of Disk Image chunks, select any chunk you wish to relocate and use the Up and Down buttons to move a selected chunk in the chunk stack.
Select image type you about to open. Usually it assigned automatically, depending on Disk Image chunks added.
Select appropriate media type. Usually it assign automatically. Use Fixed Disk by default.
Bytes per Sector
Enter sector size in bytes;
Sectors per Track
Enter track size in sectors;
Tracks per Cylinder
Enter cylinder size in tracks;
Save DIM File as...
In case of manual composition of Disk Image properties you may save final configuration file for later use; Click Next to continue.
Verify and confirm parameters for the disk image to be opened.
Click Verify Disk Image to read the Disk Image structure and initiaite verification process.
When verification is completed you will see verification report indicating current integrity of your Disk Image. Click Finish to close the Wizard.