Active@ UNDELETE allows you to create virtual entities for better access — virtual disks and virtual partitions to emulate the real once without affecting data on physical devices. Thus, user can emulate actual physical disk by assigning different values of disk geometry properties and read data from device with different sequence and interpretation.
Besides direct emulation of physical disk or partition (volume) user can use disks (or part of them) and disk images to create virtual RAIDS — emulation of a real physical disk array that allows you to read data from a disassembled RAID.
Using virtual disk will let you access actual data by using alternated disks geometry without a single modification on disk.
Emulates disk partitioning for advanced data access.
Virtual disk assembly - emulation of real RAID controller for data access.
Virtual disks can be used to mock real physical device with altering their attributes such as bytes per sector.
1. Select physical disk to emulate
2. Open Create virtual disk dialog
Enter disk caption to label new virtual disk in Recovery Explorer, sector size and boundaries of used space of actual physical disk.
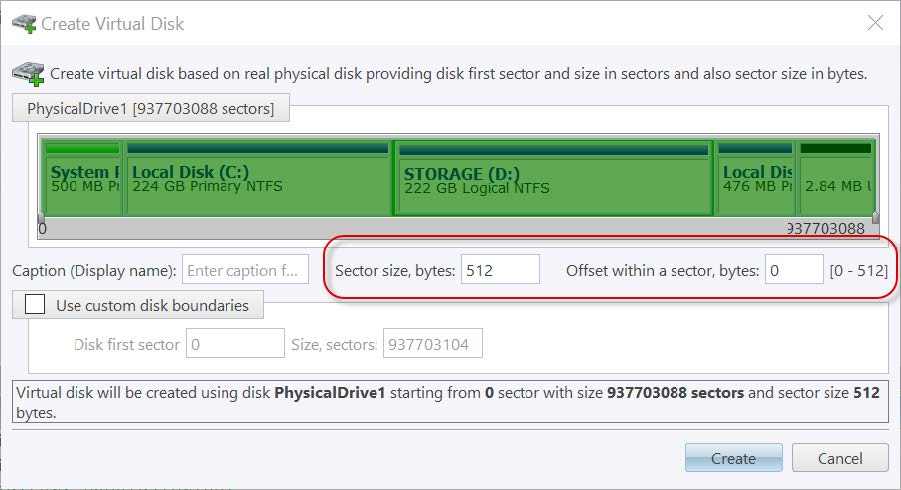
Figure 31: Create virtual disk dialog
Assign text label for virtual disk to recognize in Recovery Explorer. Optional.
Sector size in bytes. By default original physical disk sector size is used. Most disks have sector size 512 or 4096 bytes.
Start offset within a sector in bytes. By default almost all disks have zero offset. However some disks or some security software (as well as malware) can create volumes starting from non-zero offset within a sector.
Select virtual disk boundaries, by default - entire original physical disk is used.
Tip: You can create any number of virtual disks and they are saved in application session for later use. Virtual disk should appear in Recovery Explorer in group of Virtual Devices and Arrays.
Unlike Create virtual disk a virtual logical partition emulates a real logical drive or partition using a assigned geometry values. If you have a logical drive that is recognized by Windows and you cannot access the data in that drive, you may be able to gain access to your data by creating a virtual partition copy and change its attributes to gain an access. Active@ UNDELETE allows you following actions with virtual partitions:
Create virtual copy of real partition changing any attribute of its geometry without affecting disk partitioning.
Besides a copy of real partition or volume you can create custom partition linked to any physical device without changing data.
You can change attributes of virtual partition at any time.
To delete virtual partition select it in Recovery Explorer and click Delete button in toolbar or use context menu command Delete or click Del key for the same purpose.
In Recovery Explorer, select a logical drive or a partition.
Partition to copy will be selected automatically. Use sliders to specify partition boundaries - offset and size. Mouse click on partition box will select virtual partition boundaries.
Figure 32: Create virtual copy dialog
Text label to mark created virtual partition in Recovery Explorer or in Partition Manager.
Select file one of the supported file systems: FAT, FAT 32 or NTFS.
Offset of virtual partition in sectors or in MB.
Size of virtual partition in sectors or in MB.
After command is complete, newly created virtual partition will appear in Recovery Explorer ready for applicable actions, such as volume scan etc.
To create virtual partition in Active@ UNDELETE proceed as follows:
Use sliders to specify partition boundaries - offset and size. Mouse click on partition box will select virtual partition boundaries.

Figure 33: Create virtual partition dialog
Text label to mark created virtual partition in Recovery Explorer or in Partition Manager.
Select file one of the supported file systems: FAT, FAT 32 or NTFS.
Offset of virtual partition in sectors or in MB.
Size of virtual partition in sectors or in MB.
After command is complete, newly created virtual partition will appear in Recovery Explorer ready for applicable actions, such as volume scan etc.
Virtual partition properties can be changed without affecting actual data on disk.
In Recovery Explorer, select a logical drive or a partition.
In the Edit Boot Sector Template dialog, make changes to the Boot Sector Primary and Boot Sector Copy separately or simultaneously. See the Edit boot sectors for details.
Click Save button to accept changes