File Organizer is advanced feature designed to group and rename files, using their system attributes or meta attributes, before actual recovery.
Every file has system attributes like date (Accessed, Created and Modified), file type (defined by extension) and associated with that file type registered application. These attributes can be used to generate new file name or folder (group) for every file with the same attribute. In addition to system attributes some files, mostly media or images may contain meta fields such as artist name, title, album name and others. File Organizer also use these meta fields to group files in a folder with same attribute. Thus, File Organizer operates file organizing rules which defines folder grouping hierarchy and file renaming rules.
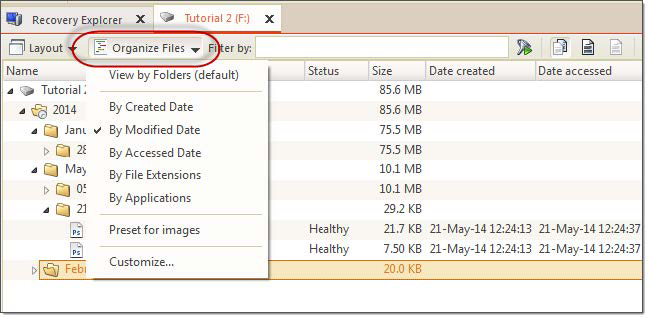
Drop-down menu in file manipulated views, such as scan results, for easy file grouping and renaming.
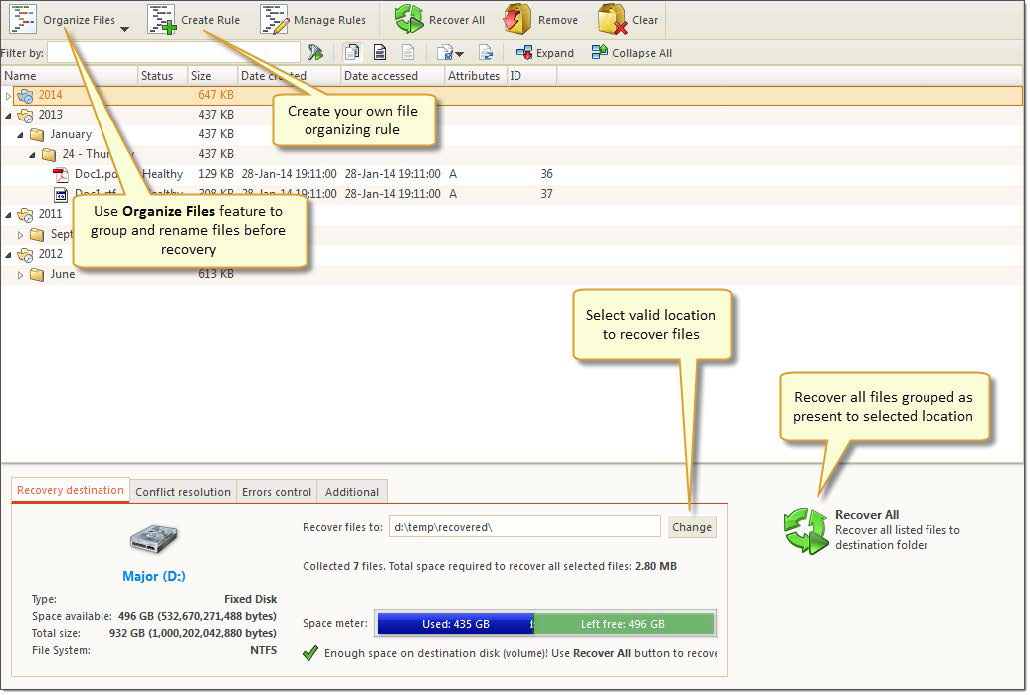
Specially designed tool view where files can be collected from different sources and organized, renamed or regrouped, before batch recovery to safe location.
In addition to predefined file organizing rules, user can define custom file grouping and renaming rules and use them in a same manner as predefined. To create or edit custom file organizing rule select Organize Files > Customize command in view's toolbar where File Organizer is used. for more detail, read: Create custom file organizing rule
User-defined (custom) rules once created in any view becomes available in all other views ready to use.
Names of files can also be changed (optional) by file organizing rule using file name pattern, applicable for every processing file or by individually applied file name pattern, depending on file type. For more information read File renaming patterns by file type .
Important: Changing file names does not affect actual files on disk - its only "virtual" file name changes.
Organize Files feature is used to group files by their attributes or renaming them by using name pattern in File Recovery wizards and in all views of Active @ UNDELETE that manipulates files:
For files detected by their signatures Organize Files feature could be very useful for applying meaningful name for every file and grouping them in folders with names generated based on file's meta tags and attributes. To apply file organizing rule simply select it from drop-down Organize Files menu. File organizing rule can be also applied on folder or a group from context menu.

Figure 64: File Organizer menu
Files in presented view can be organized by applying grouping and renaming rule. There are several predefined rules ready to use:
File organizing rule can be applied for all files presented in current view or for specific file folder or file group. To apply file organizing rule for all files in a view use toolbar drop-down button Organize Files and to apply rule for a folder or a file group — use context menu command Organize.
In addition to predefined organizing rules user can create their own rules, preserved between sessions, by clicking Organize Files > Customize... drop down menu from view's toolbar. Read Create custom file organizing rule for details.
File Organizer is utility view that helps to organize files (regroup and/or rename) using their system or meta attributes from different sources (for instance scan and search results) to recover them all at once to selected location.
1. Select files or folders in scan result view
2. In context menu select Add to File Organizer command

Figure 65: File Organizer view
All selected files will be added to File Organizer, excluding duplicates. You can repeat commands above and add files from different sources.
In File Organizer view you can remove unwanted files by selecting them and then click Remove button in toolbar or click Clear button in toolbar to remove files from File Organizer view. Use File Organizer feature to group o rename files before recovery.
File Organizer is advanced tool designed to group and rename files, using their system attributes or meta attributes, before actual recovery. Click on Organize Files drop down menu and select one of the predefined file organizing rules to group files in a view:
Select Organize Files > Customize command to create and apply custom file organizing rule. Read Create custom file organizing rule for more information.
When all files grouped and renamed as desired, select location to recover files and change default options if necessary. Click Recover All button in right bottom corner or click Recover All button in toolbar to recover all files from File Organizer view to one location.
Active @ UNDELETE can use custom file organizing rules to group or\and rename files before recovery.
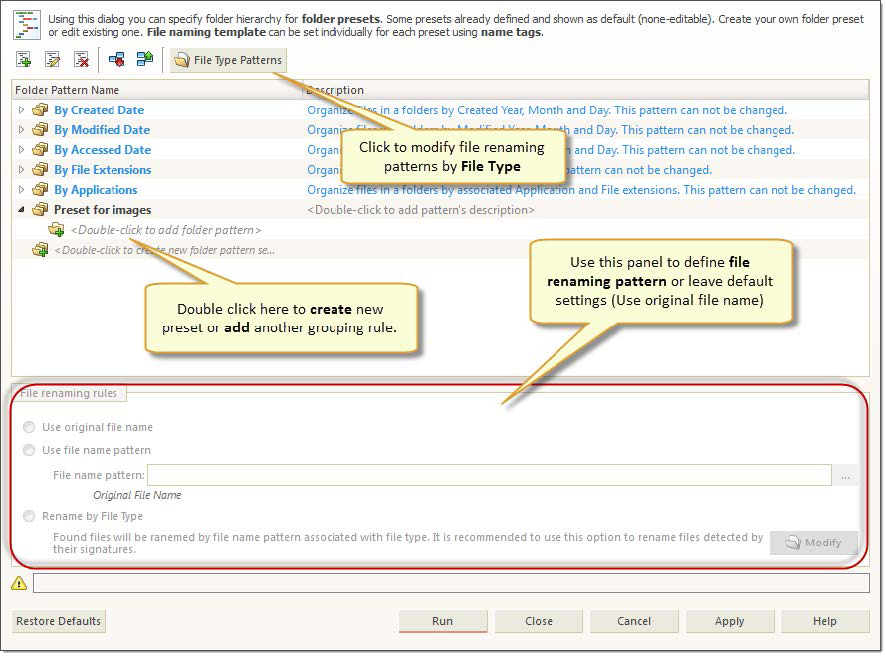
In addition to predefined file organizing rules user can create custom rules in File Organizer dialog and either apply (run) it immediately or use from context menu.
Click Organize Files > Customize command in view's toolbar where File Organizer is used.

Figure 66: File Organizer dialog
Assign text label for virtual disk to recognize in Recovery Explorer. Optional.
User can decide to leave files as-is (default value) or rename every one of them by using file name pattern (see: File attributes and meta tags) or choose to rename every file by file name pattern associated with file type (see: File renaming patterns by file type ).
Select virtual disk boundaries, by default — entire original physical disk is used.
Double click on child elements in edited rules to open drop-down control with folder pattern choices. Each following folder pattern depends on previous choice. E.g. if media file pattern selected then all following pattern choices will be relevant to media files. See File attributes and meta tags for more info.
Click Run button to apply and execute selected rule or click Apply button to save changes.
After rule is created, it will be automatically added to drop-down Organize Files menu in all related views and appear in context menu for file folders or file groups.
Note: Using file meta attributes for grouping or renaming may seriously impact file organizing performance.
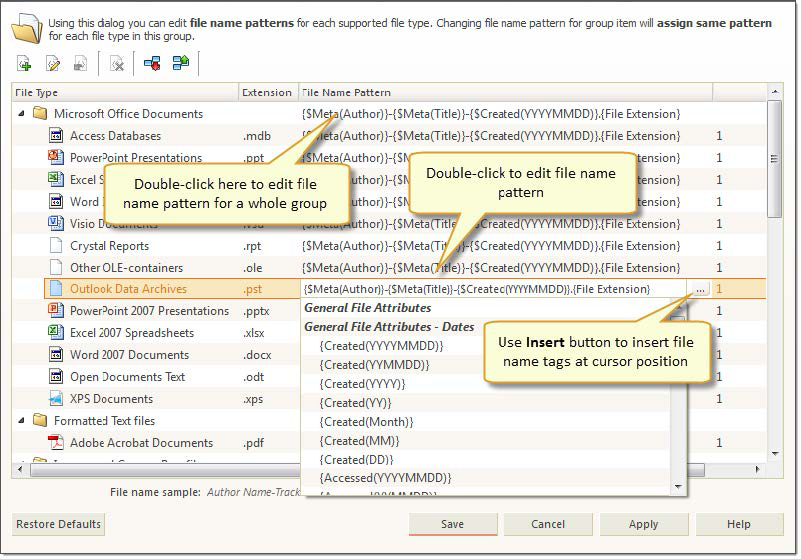
By applying file organizing rule applicable files can be renamed by using file name pattern specific to each supported File Type. In File Name Patterns dialog user can review and modify these patterns if necessary.
To modify file renaming patters for specific file time open File Organizer dialog first. Click Organize Files > Customize command in view's toolbar where File Organizer is used.

Figure 67: File Organizer dialog
To open File Name Patterns dialog click File Type Patterns button or in case of Rename by File Type option selected — click Modify button for a same result.

Figure 68: File Name Patterns dialog
In File Name Patterns dialog you can change file name pattern for each file type by double clicking on file name pattern field for desired file type or click Edit button in toolbar for same result. Click Reset button in toolbar to reset file name pattern for selected file type to defaults or click Restore Defaults to reset all file name patterns to their default values.
You can edit file name patterns for every file in a group at once by editing group pattern.
User can add custom file type pattern to existing list by clicking Add button in dialogs toolbar and completed required fields: file type (either type it in or select from drop down list) and providing file name pattern using Insert button to insert file name tags at current cursor position.

Important: Due to not supporting meta tag analysis for user defined file types, only system attributes available for name patterns
Click Apply to preserve intermediate changes or click Save button to save and close dialog.
File organizing rule uses pattern tags that represents single (or several) values retrieved as file or meta attribute from file.
Folder pattern tags are used to define file's grouping in folders by same file system or meta attributes. Each following folder pattern depends on previous choice. E.g. if media file pattern selected then all following pattern choices will be relevant to media files.
Collects all files with a same file type (file extension)
Collects all files assigned to the same default application
Created Date - Year: Full year of date when file was created, for example: 2014
Modified Date - Year: Full year of date when file was modified, for example: 2014
Accessed Date - Year: Full year of date when file was last accessed, for example: 2014
Note: Each date attribute can be additionally structured with attributes: Month, Day, Weekday.
Artist: Artist name
Album: Album name
Genre: Genre literal name
Date Taken (YYYY-MM-DD): Full date when picture was taken, for example: 2014-05-23
Date Taken (YYYY): Full year of date when picture was taken, for example: 2014
Make: Literal transcription of genre code
Model: Literal transcription of genre code
Note: Date Taken (YYYY) can be additionally structured with attributes: Date Taken (Month), Date Taken (DD), Date Taken (DD - Weekday).
Author: Full year, for example: 2014
Date Created (YYYY): Short year, for example: 2014
Date Last Saved (YYYY): Short year, for example: 14
Date Month-Day: Literal transcription of genre code
Note: Each date attribute can be additionally structured with attribute: Date Month-Day.
File name tags: File name tags are used to defile file renaming pattern. File name editor allows insert tags at cursor position and present name tags organized in groups:
{File Full Name}
Full file name, including file suffix and extension
{File Base Name}
Full file name without extension
{File Extension}
File extension without leading dot
{Sequence #}
Sequential enumerator, without leading zero, for example: 89
{Sequence 00#}
Three digit sequential enumerator, with leading zero, for example: 089
{Sequence 000#}br/> Four digit sequential enumerator, with leading zero, for example: 0089
{Created}
Created date. See below for specific Date Formats
{Accessed}
Accessed date. See below for specific Date Formats
{Modified}
Modified date. See below for specific Date Formats
{Year}
Full year of release, for example: 2014
{Album}
Name of an album
{Title}
Composition's title
{Artist}
Full year, for example: 2014
{Track #}
Number of track
{Genre}
Literal transcription of genre code
{Make}
Camera manufacturer name, for example: Nikon or Canon
{Model}
Camera model name, for example: Canon EOS M
{Software}
Application name that was used to process (export) image file
{Date Taken}
Full date when image was taken. See below for specific Date Formats
{Width}
Horizontal dimension of an image
{Height}
Vertical dimension of an image
{Author}
Document's author name
{Title}
Document's Title (if any)
{Created Date}
Date when document was created. See below for specific Date Formats
{Saved Date}
Date when document was last saved. See below for specific Date Formats
Each date tag can be presented in any of following format:
{YYYY-MM-DD}
Full date, for example: 2014-05-23
{YYYY}
Full year, for example: 2014
{YY}
Short year, for example: 14
{MM}
Month short form, for example: 11 for November
{Month}
Month literal form, for example: November
{DD}
Day of a month, for example: 23