Partition Manager is advanced Active@ UNDELETE tool, that allows you to perform disk partitioning tasks, such as creating partitions and volumes, formatting them, and assigning drive letters. Initialize raw disk, edit partition tables and more.
Partition Manager is advanced disk utility that allows you to perform disk partitioning tasks, such as creating partitions and volumes, formatting them, and assigning drive letters. Initialize raw disk, edit partition tables and more.
Most of these changes to disk partitioning are recorded in dedicated backup files thus at any time these changes could be rollback at certain point. See Rollback Partition Changes for more information.
To open Partition Manager click > Tools  Partition Manager in main application menu or use shortcut Ctrl+M at any time when running Active@ UNDELETE.
The main features of Partition Manager are:
Partition Manager is a separate module of Active @ UNDELETE - advanced data recovery toolbox. For more features, like:
To make disk accessible for application it needs to be initialized first by one of the following partition style:
Danger: Do not initialize disk if you are about to recover lost data from it! Use Scan for deleted partitions and files by their signatures to retrieve your files fist.
1. Select disk to initialize
In Partition Manager select not-initialized Disk (Physical Disk).
2. Open the Initialize Disk dialog
Confirm disk selection and other options in opened dialog.
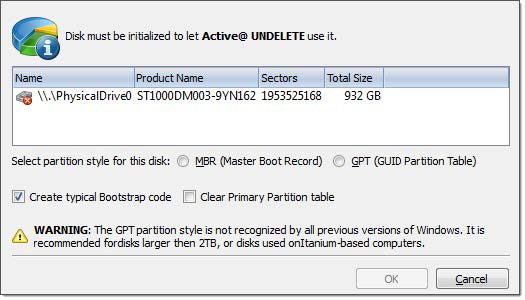
Figure 56: Initialize Disk dialog
Select either MBR (Master Boot Record) or GPT (GUID Partition Table) partition style.
Note: GPT partition style is not supported by older versions of Windows. It is recommended for disks larger then 2TB. For all other purposes we recommend to use MBR partition style Create typical bootstrap code Default generic bootstrap code will be written if this option is on.
Primary partition table records will be cleared.
Warning: It is highly recommended to not clear primary partition table in case of restoring deleted or damaged disk partitioning.
After disk initialization it should be visible and accessible in Partition Manager for other actions, such as Create partition and more.
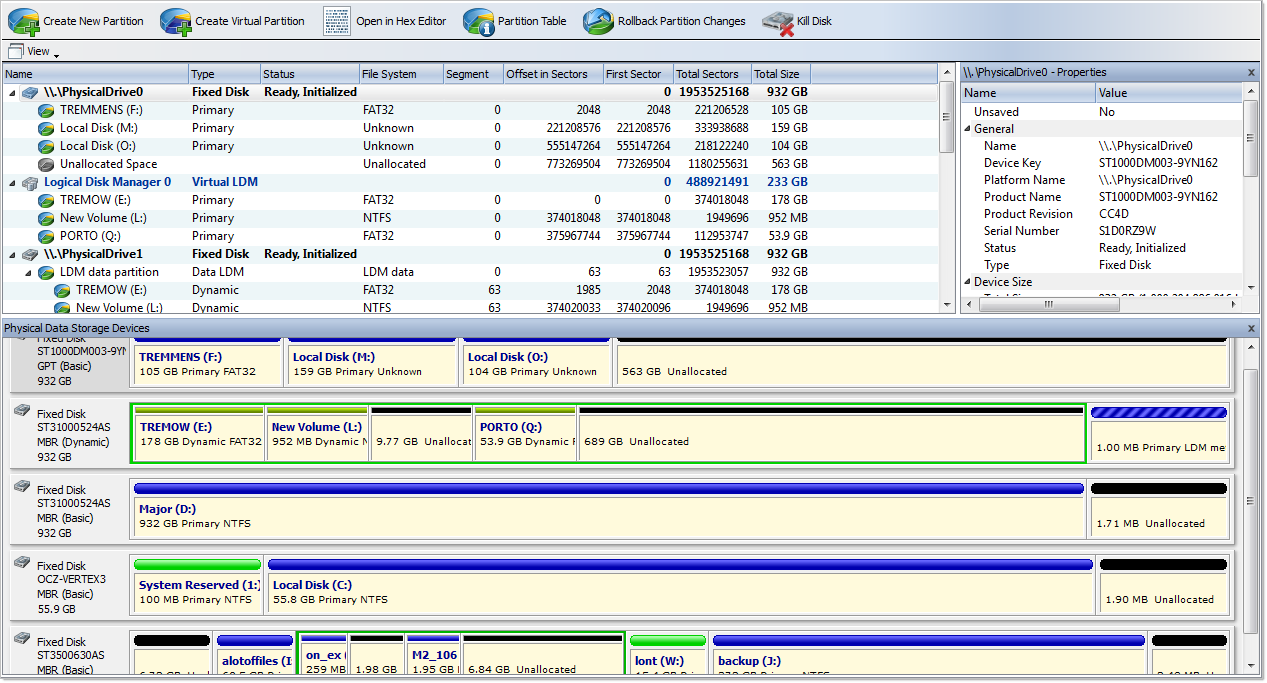
Partition Manager provides essential functionality to handle disk partitioning under windows environment, such as:
One of the unique feature of Partition Manager is Rollback partition changes — ability to revert any if the actions mentioned above.
1. Select partition location
In Partition Manager select a disk (physical device) or unallocated space node.
2. Open the Create New Partition dialog
Use sliders to specify partition boundaries — offset and size. Mouse click on unallocated space will select it to utilize all space available.
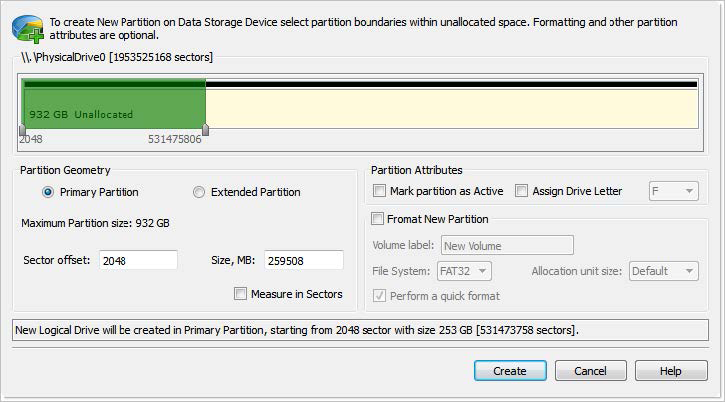
Figure 57: Create Partition dialog
Partition can be created as Primary partition (of number of available Primary partitions are not exceeded) or as Extended partition.
First sector of created partition. It can be set exact by numerical value entered in text box or by moving left slider in Device View control
Partition size can be set in megabytes or in sectors, depending on state of Measure in Sectors check box
Newly created partition will be set as Active Partition
For Primary Partition or Logical Drive on extended partition drive letter can be assigned from the list of available in the system drive letters
Text label of partition (disk). This field can be blank
Select file one of the supported file systems: FAT, FAT 32 or NTFS.
Depending on selected file system and total partition (disk) size available allocated unit size may be different. Default value of unit size is recommended.
After partition created, it should appear in Partition Manager available for other actions like formatting.
1. Select volume
In Partition Manager, select a logical drive (partition) node.
2. Open the Partition Attributes dialog
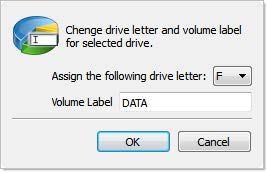
Figure 58: Create Partition dialog
Select new drive letter from drop-down list of available drive letters and enter volume label if necessary.
3. Click OK to complete changes
After command is complete, volume item should appear in Partition Manager with new attributes.
Existing logical drive (volume) can be extended to use unallocated space available right after that partition or shrunk to utilize unused space. To resize Logical Drive (Partition):
1. In Partition Manager select a Logical Drive (volume) node.
2. Open the Resize Volume dialog:
3. Define new partition size
Using Resize Volume dialog to define new partition (volume) size

Figure 59: Resize Volume dialog
Use radio buttons to expand to use maximum space available or shrink to last used cluster. Use custom option to define exact new size of partition.
Note: Use device control drug'n'release feature to set approximate partition size.
Warning: Logical drive (volume) resize is not part of Rollback feature - all changes are final and can not be undone.
4. Click Resize to complete changes
1. Select volume
In Partition Manager select a Logical Drive (Partition) node.
2. Open the Format Partition dialog
3. Adjust dialog options
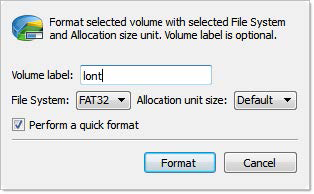
Figure 60: Format Partition dialog
Text label of partition (disk). This field can be blank.
Select file one of the supported file systems: FAT, FAT 32 or NTFS.
Depending on selected file system and total partition (disk) size available allocated unit size may be different. Default value of unit size is recommended.
4. Click Format button to start formatting process
Danger: All data on formatting Logical Drive (partition) will be lost! Backup all your valuable data before formatting. When formatting is complete, volume item should appear in Partition Manager with new attributes and file system.
Some critical partition layout changes made to a physical device are backed up by default. Users can rollback these changes at any point by using the Rollback Partition Changes tool. These changes are:
To rollback changes made to a physical device, select a restore point in the chronologically ordered list and click the Roll Back button to complete the changes.
Disk editing in Partition Manager includes:
These features available not only from Partition Manager itself, but also from any other view that uses partition of hard drives in a same manner as in Partition Manager view.
Primary Boot Sector and Copy Boot Sector (if applicable) can be edited and synchronized by individual fields. Active@ UNDELETE provide "suggested" boot sector with most appropriate values for reference.
1. Select logical drive (partition)
In Partition Manager or Recovery Explorer select a logical drive (partition) node.
2. Open the Edit Boot Sectors dialog
3. Edit boot sectors
Use radio buttons near the value fields to select and click OK button to confirm changes.

Figure 61: Synchronize Boot sectors dialog box
4. Click OK to complete changes
You can edit Disk system records (MFT, Boot sector etc.) by using specially designed forms.
1. In Recovery Explorer select a physical device
2. In Partition Manager select a physical device
3. Open the Edit Partition Table dialog:
4. Change desired fields to appropriate values

Figure 62: Edit Partition Table dialog
Warning: Saving incorrect values might render the partition useless. You may not undo changes that you make in this dialog.
5. Click OK to complete changes
For freshly initialized (empty) physical disk partition style can be changed at any time from MBR to GPT or from GPT to MBR.
1. Select disk in Partition Manager
2. Change partition style
If conversion is successful, then device partitioning will be changed and property label will indicate new attribute.
Figure 63: Disk partitioning style